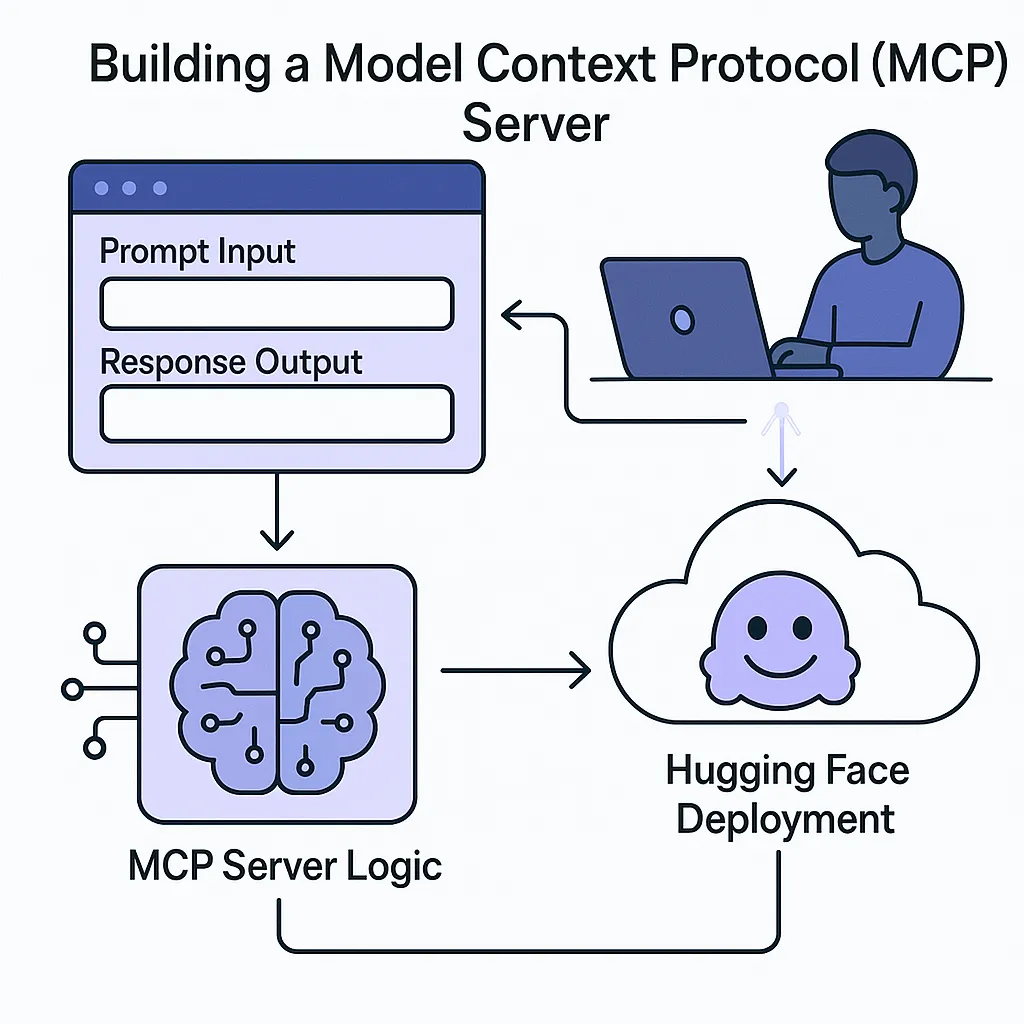
使用 Gradio MCP 建立伺服器,并部署在Hugging Face Space
使用Gradio MCP 建立情感分析伺服器,并且一并部署在Hugging Face Spaces上,以利後續實現
文章目錄
Gradio MCP 整合介紹
Gradio 透過自動將您的 Python 函數轉換為 MCP 工具,提供了一種簡單的方式來創建 MCP 伺服器。當您在 launch() 中設置 mcp_server=True 時,Gradio 會:
- 自動將您的函數轉換為 MCP 工具
- 將輸入元件映射到工具參數架構
- 從輸出元件確定回應格式
- 設置 JSON-RPC over HTTP+SSE 進行客戶端-伺服器通訊
- 創建網頁介面和 MCP 伺服器端點
專案設置
首先,讓我們為專案創建一個新目錄並設置所需的依賴項:
# Windows

mkdir mcp-sentiment
cd mcp-sentiment
python -m venv venv
source venv/bin/activate
pip install "gradio[mcp]" textblob
創建伺服器
Hugging Face Spaces 需要一個 app.py 檔案來建立 space,所以 Python 檔案的名稱必須是 app.py 創建一個名為 app.py 的新檔案,包含以下程式碼:
import json
import gradio as gr
from textblob import TextBlob

def sentiment_analysis(text: str) -> str:
    """
    分析給定文本的情感。

    Args:
        text (str): 要分析的文本

    Returns:
        str: 包含極性、主觀性和評估的 JSON 字串
    """
    blob = TextBlob(text)
    sentiment = blob.sentiment

    result = {
        "polarity": round(sentiment.polarity, 2),  # -1 (負面) 到 1 (正面)
        "subjectivity": round(sentiment.subjectivity, 2),  # 0 (客觀) 到 1 (主觀)
        "assessment": "positive" if sentiment.polarity > 0 else "negative" if sentiment.polarity < 0 else "neutral"
    }

    return json.dumps(result)

# 創建 Gradio 介面
demo = gr.Interface(
    fn=sentiment_analysis,
    inputs=gr.Textbox(placeholder="輸入要分析的文本..."),
    outputs=gr.Textbox(),  # 從 gr.JSON() 改為 gr.Textbox()
    title="文本情感分析",
    description="使用 TextBlob 分析文本情感"
)

# 啟動介面和 MCP 伺服器
if __name__ == "__main__":
    demo.launch(mcp_server=True)
程式碼理解
分析關鍵元件:
- def sentiment_analysis:
- 接受文本輸入並返回字典
- 使用 TextBlob 來分析情感
- Gradio 介面:
- gr.Interface 創建網頁 UI 和 MCP 伺服器
- 函數自動暴露為 MCP 工具
- 輸入和輸出元件定義工具的架構
- MCP 伺服器:
- 設置 mcp_server=True 啟用 MCP 伺服器
- 伺服器將可在 http://localhost:7860/gradio_api/mcp/sse 存取
- 您也可以使用環境變數 export GRADIO_MCP_SERVER=True 啟用
運行伺服器
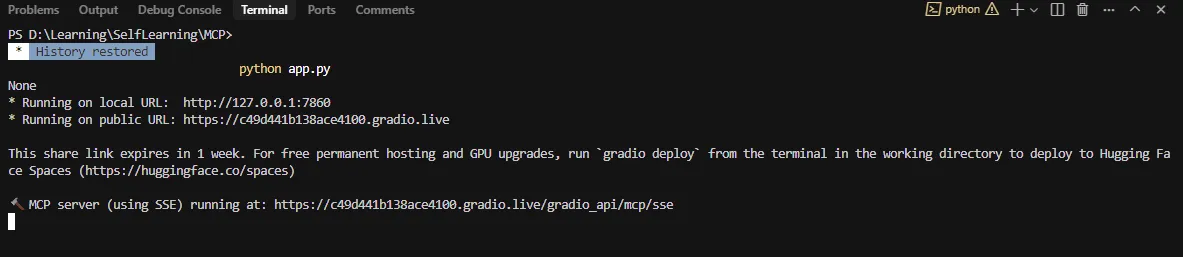
運行以下指令啟動伺服器:
python app.py
您應該會看到輸出顯示網頁介面和 MCP 伺服器都在運行。
網頁介面在 http://localhost:7860
MCP 伺服器在 http://localhost:7860/gradio_api/mcp/sse
測試伺服器
您可以用兩種方式測試伺服器:
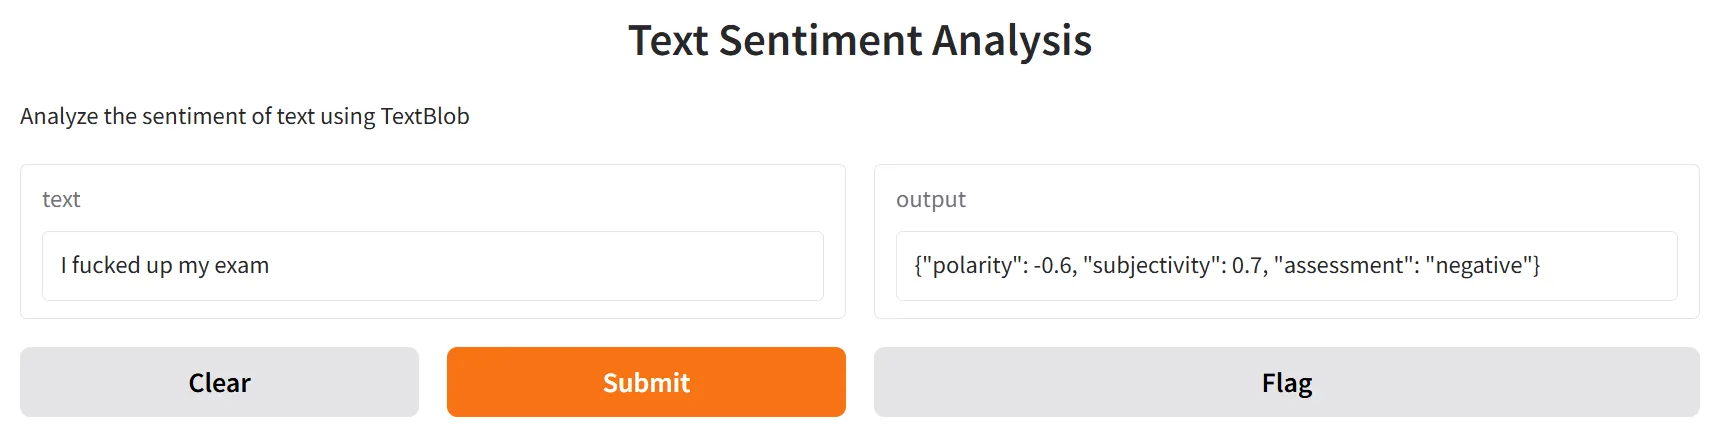
- 網頁介面:
- 在瀏覽器中開啟 http://localhost:7860
- 輸入一些文本並點擊「Submit」
- 您應該會看到情感分析結果
- MCP 架構:
- 輸入 http://localhost:7860/gradio_api/mcp/schema
- 這顯示客戶端將使用的 MCP 工具架構
- 您也可以在 Gradio 應用程式頁面底部的「View API」鏈結中找到這個
部署到 Hugging Face Spaces
為了讓其他人可以使用您的伺服器,您可以將其部署到 Hugging Face Spaces:
在 Hugging Face 上創建一個新的 Space:
- 前往 huggingface.co/spaces
- 點擊「Create new Space」
- 選擇「Gradio」作為 SDK
- 命名您的 space(例如:「mcp-sentiment」)
創建創建 requirements.txt 檔案:
gradio[mcp] textblob
將您的程式碼推送到 Space:
git init
git add app.py requirements.txt
git commit -m "Initial commit"
git remote add origin https://huggingface.co/spaces/YOUR_USERNAME/mcp-sentiment
git push -u origin main
您的 MCP 伺服器現在將可在以下位置存取:
https://YOUR_USERNAME-mcp-sentiment.hf.space/gradio_api/mcp/sse
故障排除
筆者在執行上述推送程式碼到Hugging Face Space時,遇到了下列錯誤:
remote: Password authentication in git is no longer supported.
You must use a user access token or an SSH key instead.
原因是自 2023 年 10 月 1 日起,Hugging Face 停止支援密碼身分驗證,因此當你使用 HTTPS URL 推送時,會收到錯誤訊息。 那麽解決方式我寫了另一篇文章來解決,感興趣的可以點擊下方連結:

參考資料
- Gradio. “Building MCP Server With Gradio.” https://www.gradio.app/guides/building-mcp-server-with-gradio
- Hugging Face MCP Course. “Gradio MCP Integration.” https://huggingface.co/learn/mcp-course/unit1/gradio-mcp
- Hugging Face MCP Course. “Building the Gradio MCP Server.” https://huggingface.co/learn/mcp-course/unit2/gradio-server
- Hugging Face Blog. “How to Build an MCP Server with Gradio.” https://huggingface.co/blog/gradio-mcp
- CSDN. “使用Gradio构建MCP服务器:为LLM扩展工具能力.” https://blog.csdn.net/gitblog_00782/article/details/148326111
- MCP Course. “Gradio MCP — MCP Fundamentals, Architecture and Core Concepts.” https://mcpcourse.org/units/unit1/gradio-mcp/